Pages

Tuesday, July 31, 2012

a pair, and a pair

I have some blogger guilt.  Haven't posted in a while, so sorry :)  I didn't realize how busy I've been until I looked at the calendar today and realized it's the last day of July.  I did work on a few great things last week.


First up is this great pair of brass lamps.
I read an article that said you could use chalk paint on metal.  I was very hesitant at first, but since I snagged these guys off Craigslist for cheap I figured I'd give it a shot.  Slapped on the first coat and let it sit overnight, just in case it needed extra drying time.  It didn't, but who knew? :) 
If I were going for a super distressed look, the 1 coat would've done the trick, but I wanted these guys to look a little more finished.  While they were drying I got started on these awesome side tables.
I used some of the negotiating tips I learned here from the amazing Holy Craft, and got these tables for a steal!!
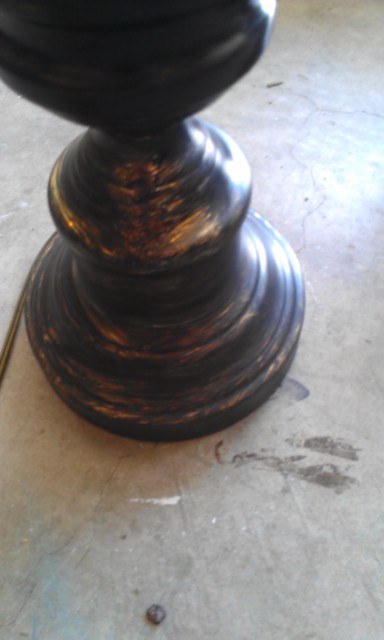
I knew right away that I wanted to use Valspar's flood tide(turned chalk paint) on the base and legs, but wasn't sure about the drawers.  While I figured that out I went back to my lamps that used 3 coats of Valspar's Lincoln cottage, turned chalk paint with my special recipe.  Then a coat of soft wax to seal em up, and check out the transformation!!
They look like they belong on my yellow buffet, and it was tough to let them go....but down to the shop they went!  I really love their shape and think the black suits them perfectly!!  While I was taking lamp photos I figured that the drawers on the side tables should be grey.  I would love to tell you the exact color, but I've mixed it up so many different times that it's now my "custom" grey.

And keeping up with that whole chalk paint on metal, I painted the hardware the same color as the tables.  I thought to give it a little character I would paint the "shell" detail the same as the drawers too.  The table bases and drawers each took 2 coats, a little distressing and some paste wax to seal them up. 
My husband rarely voices any opinions about the stuff I do other than to say "Good job babe!"  But these tables we had a half hour conversation about how they should stay at our house.  So you better get down to the shop and make them yours before he steals them back.


Head down to Persnickety's Awesomeness Emporium to check out my new stuff and all the other amazing pieces in the shop!!  Find us on Facebook at Persnickety's Awesomeness Emporium or Good one, Den! to see what we'll come up with, or just continue to follow along here!!!
Thanks!!!
Denniel


Tuesday, July 17, 2012

A Giveaway!!!

Ok y'all, here it is, my very first giveaway.  Hopefully this goes as well as I'm imagining and I'll do another giveaway down the road. 
Since this is still a fledgling little blog I'm giving away 2 small-ish things....

First you can choose either a Scary Mary or Scary Gary

And second, you can choose one of the pillow covers I've done

There are more to choose from on my fb page

How to enter....
I'll even give you 2 chances to win.  First, become a follower on my blog(in that little box in the upper right hand corner) and leave me a comment letting me know that you've done so.  Second, like my fb page, and leave an additional comment.  For those of you that have already liked my fb page, you can still leave that second comment saying you're a "liker".  I know some of you have been patiently waiting for the giveaway, so I don't want you to miss out.  All comments need to be received by Saturday July 21st, and I'll announce the winner on Sunday the 22nd. 
Thanks for following along, and Good Luck!!!!!

Tuesday, July 10, 2012

Ruffled Table

Since summer is finally here in good old Washington, garage sale season is in full effect.  Last weekend being no exception the whole gang loaded up and off we went.  I found this amazing table at a warehouse type swap meet place.
Such a great shape, and AMAZING legs!!  But it was a little wobbly and had some cracks.  I couldn't walk away from it, so it came home with me.  Then came that moment of panic....can I fix it, will I be able to make it "un-wobbly".  Aaacckk!!  So I let it sit in the workshop (aka the garage) for a few days.  Then this morning I thought ok, man up and do it.  So I did, and thankfully when I flipped the table over I realized that the screws just needed to be tightened and the wobbly went away.  I sanded the top just a little to get rid of the water stains and other random marks.
I bought a few new paint colors from Lowe's yesterday so I would be ready to work on projects and not give myself anymore excuses.  After I bought said paint I knew right away I wanted to use the Valspar Flood Tide.  So I got started on the top.

While painting the top a moment of inspiration...ooh, 2 toned could be great on this piece and I knew I had some white chalk paint leftover from another project.  So after I did 2 coats on the top and legs, I pulled out my tape and got to work on the white.  When then 2nd coat of white dried I did seal it with a soft wax.
I will admit, going the 2 toned route, especially with these great curvy legs was a bit tedious.  But I really think it turned out amazing. 
When I was painting the curvy part white my 7 year old came out to the "workshop" and asked if I was giving the table ruffles.   I cracked up and said, no buddy, but from now on I will call it the ruffled table :)  This will be going down to the shop with me on Thursday this week.  Come down and check it out, or just say hi.
And stay tuned later this week I'm putting together a little give away you won't wanna miss!!

Friday, July 6, 2012

table redo part duex

So I've actually redone this table before but sadly I don't have any "original" before pics.  It's a great table but it just seemed kinda sad sitting in the shop not getting the love it deserves.  A few weeks ago Mandi and I kept walking past it and talking about maybe painting it again. 
 Right away my brain hit overdrive thinking about all the different color combos I could paint on said table.  Mandi suggested white, I had just finished a 2 tiered table in white and didn't really wanna go there again.  Then my sis in law also suggested white and I reluctantly caved.


  I pulled out my trusty sander and started to get to work....about 10 minutes in the little sander that could, just couldn't anymore. Poop!! Now what? Being that I am "frugal" I knew there wasn't any kind of budget for a new one.  Luckily I have pretty great friends and one that would let me borrow her sander.  So sand away the clear poly on the top and existing sage green paint I did! 
 Then I pulled out my batch of creamy white chalk paint and put 2 coats on.  On the top I did 2 coats of dark mahogany stain and sealed the whole thing with wax....after some light distressing of course.  Now I sorry I ever doubted the white suggestion.  This is another piece that I would gladly keep for myself :). But I guess I'll take it back to the shop and wait for it to find a good home!


This is 1 coat of paint and 1 coat of stain, big improvement, but not quite done.


Almost done!  Needs some distressing and a clear coat of wax!


Tada!  All done and in the shop now!!


On a personal note my laptop is in varying stages of dysfunction so I am learning the ropes of blogger on my phone.  Hang in there with me if you dare :)