Pages

Friday, October 26, 2012

Oh Alfred!

I know you've all seen Alfred before...He was a great Craigslist find and the focus of my last post about stripper.  Again I didn't say "a" stripper....although after watching Magic Mike this last week, that would've been WAY better :)  Anyhow, here he is, in his FINAL before pic.
All dingy and dirty and in need of some help.  I know I've mentioned it before but I like to try to do any research I can when I get a new piece.  It's kind of fun for me to find out when (about) it was made, if I can find it.  This guy is a 1955ish Heywood-Wakefield.  I say "ish" because while researching I discovered this one was part of the Cadence line that was manufactured from 1955-1959.  Still pretty cool that it has some history.  While scouring for information I found that there are lots of Heywood purists, who would probably scream their faces off if they knew I planned to paint it.  But painting is what I do, and if there was a chance I could've restored it with minimal effort, I would've.  But remember the stripper incident...
So ya, I knew I was gonna paint it.  The wood underneath all that paint wasn't nice enough to restore.  But the original mangy paint that was on it inspired me to do it in black.  His lines are strong and masculine.  Black just seemed fitting.  And yes once again I've named the furniture.  I will divulge(much to husband's dismay) that Alfred is a family name.  My hubby's grandpa is Alfred, and my father-in-law and husband share the middle name Alfred.  But all that aside, I still instantly think of the butler on Batman :) 
So I'm sure you're scrolling through, saying, alright, alright just show me the pictures already...patience.  In case you wanted to know I used Valspar's Lincoln Cottage Black.  It's kind of become my favorite/go to black paint.  Oh, and yes I turned it into chalk paint.  So much easier to work with, and really does cover well!  After 2 coats of paint, using a fine grit sanding block in between, I did some minor distressing.  Then 2 coats of wax to seal it up. 
 
 
Due to his age he was missing a drawer, and ironically a "matching" drawer was broken. I knew right away I wanted to get baskets for it. Just made it look a little more complete, with the missing drawers. I did paint the insides of the missing parts just to unify it.  But searching for baskets became an obsession, which frustrated the heck out of me.  Luckily a trip to Homegoods was successful and the obsession was quelled!!  I also had to find new hardware for this guy.  The before pic looks like it has those cool teardrop type of pulls, but no, those would be knobs attached to crazy bent screws.  I didn't want to detract from his shape with fancy knobs, so I just got some wood ones and painted them to match.  This project was definitely a learning one for me.  I learned that I will never strip a piece of furniture again, if I can help it.  And I also learned that I will do my best to stay away from pieces missing drawers.  Too much obsession time wasted looking for those darn baskets :)
Ready?  Here he is, all done up.  Just dropped him at the shop this morning!!


So, what do you think?  What projects have taught you lessons you won't soon forget?  Stay tuned to see what I come up with next!!
 
~Denniel


Thursday, October 18, 2012

Working with Stripper

I can't even say the word stripper without cracking up, or getting some kind of weird visual.  But I'm talking about paint stripper this time around.  The only similarities between the two are that split second of instant gratification that comes right before you just feel dirty and need to shower.  And as I'm typing this, please know that I am fresh from a shower :) 
I think you've seen this guy once before, maybe when I bravely(and mistakenly) posted about the "jinx".  But this guy is the sole reason I'm working with stripper.
 

This is Alfred.  He is big and heavy, and really well made, and will eventually be distinguished like his name implies.  He's also a vintage 1950s Heywood Wakefield that I scored from Craigslist. 
He was also painted by Satan, with a paintbrush made from demon fire and a paint combination that must be lead, concrete, wallpaper glue, spray paint, and death.  You look at the picture and think, ok, he's a little rough, he's got some dings, can't be that bad.  Well, I made that mistake too.  I pulled out my sander thinking that just sanding away would be the way to go.  WRONG!  Sanding it just made a black film fly everywhere, and stick to my body.  It also made the top look as if it spent the last 50 years in the only remaining leper colony. 
So I texted my girl Mandi at Persnickety's, remembering a hilarious conversation we had about stripper and knew she'd have the info I needed.  She said to use this.
Source

 
So I went and got it and a handy putty knife/scraping thingy.  I read the directions and felt ready to go.  Directions say to apply in a small area and wait 15 minutes.  I did exactly that.  Only the angry top layer of paint came off, and it took ALOT of elbow grease.
Then I realized that sometimes directions are more like guidelines, or jumping off points.  Like sometimes how your oven cooks a little hotter so you have to adjust the time and temp.  Well I needed to adjust my timing as well.  I double checked the directions and did notice that it said something about "stubborn" paint could require more applications.  Well this is Satan paint.  And for whatever reason 15 minutes in my garage just caused the stripper to dry completely up and require all that elbow grease.  I finally timed it just right and 7-8 minutes actually works better for me.  That was of course after several tries of getting the timing right.
First there was 10 minutes.....
This resulted in gross clumps of yucky.  Think of vampires getting killed.  I don't mean like on Buffy where they poofed into a cloud of dust.  I'm talking True Blood where they explode into that black/red sticky disgusting goo(this realization was given to me by Mandi during our previous stripper conversation).  It is the most accurate and hilarious description I have ever heard!
Then came about 9 minutes....


Not quite perfectly removed, but so much better than that whole gooey mess.  Now I will say that overall it's kind of a gross process, and there is a lot of goo.  But when you time it just right it comes off so much easier, and the goo is way more manageable.
At about 7-8 minutes this is the final product..
I did have to go back over it with my scraper and get the stuff that was kind of hanging on, but apparently timing is everything.
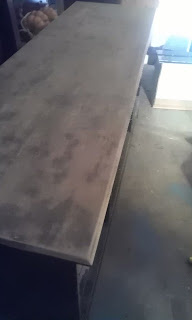
This is Alfred's top after all that elbow grease and getting my timing down.
The wood isn't in the best shape.  But I can't imagine how I'd look after Satan painted me with his demon fire paintbrush.  Once the rest of the drawers are done I'll need to resand everything and start on the fun part, the painting of course!!
Stay tuned next week for Alfred's big reveal!!
 
~Denniel
 
 
All opinions of this product are my own, I was not paid or compensated in any way!

Wednesday, October 10, 2012

A small(s) week

I know I said a while ago that I would start working on that massive Heywood that I found on Craigslist.....but I just haven't gotten started.  I think after all the work I did on Ethel I haven't found the motivation to tackle another big project.
So this week I've been working on some small stuff, which we call "smalls".  You know, the stuff that fills the walls and allows us to somewhat stage photos.  All those cool vintage finds, old frames we love to paint, knick-knack type thingys.  The stuff that makes Persnickety's look more like a fun place to shop versus a stark furniture warehouse. 
I found a new place in Tacoma and it had lots of goodies.....
like this vintage American Family food scale

and this cloche with a base....
the base was a little banged up so I decided to paint it with chalkboard paint, to give it some personality :)
Could even personalize it with a cute cupcake and message for someones birthday, but for now it's Halloween themed, like everything else in my house :)
Or just use the cloche all by itself.  Would be cute with some mini gourds for fall, or my tiny collection of pine cones.  I've even seen a collection of baseballs in the spring, and I imagine some cute ornaments for Christmas.
 
I also found these
they were originally gold and had some "interesting" art work....I though they would look so much better with a couple coats of aqua chalk paint....
look at this cute detail
 
ok this isn't the best picture, but I swear it's really cute!!
Today I met up with my friend Alison at The Modern Cottage Company to drop off her custom order of 20(yes 20) pillow covers.  Which has kept me busy this last week, but I was so excited to do something to essentially "grow" my little business.
This is what a stack of completed pillow covers looks like
Alison had some really great fabrics and these will be available at her store soon! 
But I digress, for whatever reason our meeting spot has become a local Value Village, so OF COURSE I had to go inside to make sure I wasn't missing anything. 
And I found these guys
Vintage Ball jelly jars, with super cute (original) lids!
I grabbed the blue, white and green and found the crate they're in too!
So there's my random finds for the week, guess it matches my random post. 
Oh for anyone who is wondering, I DID jinx myself.  Since my "jinx" post I haven't found a single thing on Craigslist :)  But that's ok, I'm finding fun new places to search for treasures.  And I'm putting it out there to hold myself accountable, I WILL start working on the Heywood next week!
Stay tuned to see it's progress
~Denniel